Quickstart
Build your first quantum circuit in under two minutes, on your local environment - no sign-in or API key necessary.
- Download Python and use a virtual environment with Qiskit (recommended).
Click to expand for more information about Python.
- To install Python, first check the "Programming Language" section on the Qiskit PyPI project page to determine which Python versions are supported by the most recent release. For download instructions, see the Python Beginners Guide.
Click to expand for more information on virtual environments.
Click to expand for more information on virtual environments.
- Use Python virtual environments to separate Qiskit from other applications. A Python virtual environment is an isolated space to work with Python for a specific purpose — so you can install whatever packages you wish, and set up libraries, dependencies, and so on, without affecting the "base" Python environment on your machine.
One important advantage of a virtual environment is that if your Python environment becomes corrupted, you can easily delete it and start over!
Choose a preferred location in which to store information about your virtual environments. Typically they're stored in a directory named .venv within each project directory.
To set up a virtual environment, navigate to your project directory and create a minimal environment with only Python installed in it.
python3 -m venv .venvpython3 -m venv .venvpython -m venv .venvNext, activate your new environment.
source .venv/bin/activatesource .venv/bin/activateIf using PowerShell:
.venv\Scripts\Activate.ps1If using Git Bash:
source .venv/scripts/activateIf using command prompt:
.venv\Scripts\activate1. Install Qiskit
Run the following command in your terminal to install the Qiskit and Matplotlib packages, as well as the Qiskit visualization module.
pip install qiskit matplotlib qiskit[visualization]

# On a zsh terminal, use this line instead:
# pip install qiskit matplotlib 'qiskit[visualization]'
2. Build your circuit
Open a Python environment, then run this code to build a Bell state (two entangled qubits).
from qiskit import QuantumCircuit
from qiskit.primitives import StatevectorSampler

qc = QuantumCircuit(2)
qc.h(0)
qc.cx(0, 1)
qc.measure_all()

sampler = StatevectorSampler()
result = sampler.run([qc], shots=1024).result()
print(result[0].data.meas.get_counts())
Output:
{'00': 505, '11': 519}
The expected output is a near-even split between '00' and '11'.
3. Visualize your results
To get a histogram of your results, add the following code to your program.
from qiskit.visualization import plot_histogram

counts = result[0].data.meas.get_counts()
plot_histogram(counts)

# Include the next line if you are not using Python in a Jupyter notebook
# plt.show()
Output:
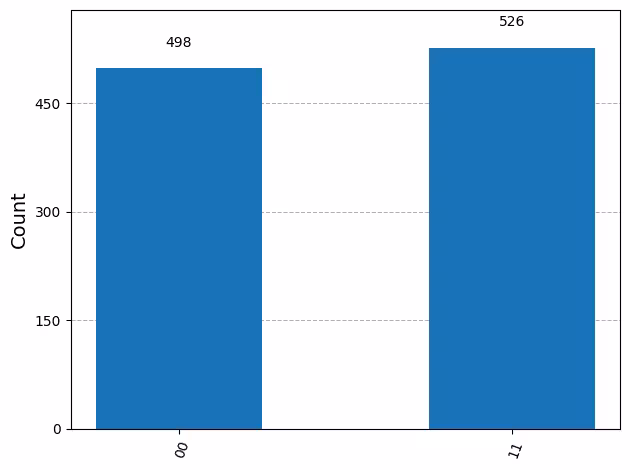
This result is a signature of quantum entanglement.
4. See what happens
Try changing the code to see how it affects the results. For example:
-
Add a third qubit by changing to
QuantumCircuit(3), and add a second CX gate withqc.cx(1,2). The measurements should then change to 000 and 111, which means all three of these qubits have been entangled. -
See your results shift by adding
qc.x(1)to the end of the circuit.
Next steps
- Run a circuit on real quantum hardware in the Hello world tutorial.
- Not ready to run on hardware? Start your quantum journey with the Basics of quantum information course.