Refresh backend properties with real-time benchmarking
Usage estimate: 4 minutes on ibm_boston, including the optional examples (NOTE: This is an estimate only. Your runtime might vary.)
Learning outcomes
- Why the properties that a QPU reports can differ from the current behavior of the device, and when you should measure them again yourself
- What each of the five standard characterization experiments (readout, single-qubit randomized benchmarking, layered two-qubit randomized benchmarking, , and ) measures
- How to run the full characterization suite in a single call or step by step, and obtain a backend object with refreshed properties
- How to compare the measured properties against the reported ones, and why some differences reflect measurement methodology rather than device drift
- How to use refreshed properties for qubit selection, and how to check whether they improve the results of a GHZ-state circuit
Prerequisites
- The Qiskit patterns workflow
- Execution modes, in particular batch mode
- How to explore QPU information, such as backend properties and calibration data
Background
Every IBM Quantum® QPU reports a set of properties that describe the current performance of its qubits: relaxation times (), coherence times (), readout errors, and one- and two-qubit gate errors. These numbers matter in practice. The transpiler uses them to select the physical qubits for your circuit, error mitigation techniques rely on them, and you might use them to judge whether a device is working well enough for an experiment.
The reported properties come from calibration procedures that typically run about once a day. Superconducting qubits, however, can drift on shorter timescales, and transient defects (known as two-level systems) can temporarily degrade a qubit that performed well at calibration time. In addition, you often transpile a job well before it runs, so decisions based on the reported properties can depend on outdated information.
This tutorial uses the BackendCharacterization utility from Qiskit Device Benchmarking, which combines experiment construction, job submission, and curve fitting into a few calls. For roughly 70 seconds of QPU time, you receive a backend object whose properties reflect the current state of the device. You can compare these properties against the reported values or pass the backend to other tools. The final example uses the refreshed values to select physical qubits for a GHZ-state circuit and compares the results with those of the same circuit compiled with the reported properties.
The characterization experiments
The suite measures five properties, each with a standard experiment:
- Readout error (
readout): The experiment prepares each qubit in or and immediately measures it. The probability of a wrong readout gives the state preparation and measurement (SPAM) error. - Single-qubit gate error (
rb_1q): Randomized benchmarking (RB) runs sequences of random single-qubit Clifford gates that ideally compose to the identity. The decay of the survival probability with sequence length gives the average error per gate, independent of SPAM errors. - Two-qubit gate error (
rb_2q): This experiment applies the same RB method to full layers of non-overlapping two-qubit gates that run simultaneously, as in a layer fidelity experiment. Because many gates run at once, the resulting error rates include crosstalk effects and are closer to the error rates in a deep circuit. - (
t1): The experiment excites each qubit and measures it after increasing delays. The decay of the excited-state population gives the relaxation time. - (
t2): A Hahn echo experiment puts each qubit in a superposition, applies an echo pulse halfway through a delay, and measures how quickly the qubit loses phase coherence. By default, the experiment uses a single echo. A later section of this tutorial demonstrates a multi-echo (CPMG-style) variant.
Scope and limits of the refreshed properties
Keep the following points in mind when you use this workflow:
- The refreshed properties exist only in the backend object that the utility returns to you. Nothing changes on the device itself or in the calibration data that IBM Quantum reports to other users.
- The measured values are a snapshot taken with a particular methodology. Some of them, notably the layered two-qubit errors and the parallel single-echo values, are measured differently from the reported calibration data, so part of any gap that you observe comes from methodology rather than drift. This tutorial identifies these cases.
- The characterization itself costs QPU time (about 70 seconds for the full suite on a 156-qubit Heron processor), which is the cost of current information.
The workflow follows the four steps of a Qiskit pattern:
- Step 1: Map classical inputs to a quantum problem. Choose the device and the set of properties to measure.
- Step 2: Optimize problem for quantum hardware execution. The utility builds the experiment circuits directly in the native gates of the device and parallelizes them across the device.
- Step 3: Execute using Qiskit primitives. The experiments run as Sampler jobs inside a batch.
- Step 4: Post-process and return result in desired classical format. Fit the measurement data into per-qubit error maps, refresh the backend, and compare the measured properties against the reported ones.
Requirements
Before starting this tutorial, ensure that you have the following installed:
- Qiskit SDK v2.0 or later, with visualization support
qiskit-ibm-runtimev0.40 or later (pip install qiskit-ibm-runtime)- Qiskit Device Benchmarking, which also installs Qiskit Experiments (
pip install git+https://github.com/qiskit-community/qiskit-device-benchmarking.git)
Setup
Import the required libraries.
from copy import deepcopy

import logging
import sys

import matplotlib.pyplot as plt
import numpy as np
from qiskit import QuantumCircuit
from qiskit.quantum_info import hellinger_fidelity
from qiskit.transpiler import generate_preset_pass_manager
from qiskit_ibm_runtime import Batch, QiskitRuntimeService, SamplerV2

from qiskit_device_benchmarking.utilities.characterization_utils import (
    BackendCharacterization,
    plot_characterization_comparison,
)
The characterization suite builds several experiments, submits multiple jobs, and fits the results. This process can take a few minutes in total. Enable INFO-level logging so that each stage prints its progress as it runs.
logger = logging.getLogger("qiskit_device_benchmarking")
logger.setLevel(logging.INFO)
logger.addHandler(logging.StreamHandler(stream=sys.stdout))
Small-scale simulator example
This tutorial does not include a simulator example. The workflow measures the physical imperfections of a specific device: how quickly its qubits relax and dephase, and how often its gates and readout fail. An ideal simulator has none of these imperfections, so there is nothing to characterize. If you attach a synthetic noise model to a fake backend, the experiments only recover the values that you put in the model. For that reason, this tutorial proceeds directly to hardware, in the four steps of a Qiskit pattern.
Large-scale hardware example
Step 1: Map classical inputs to a quantum problem
In this workflow, the "problem" is the device itself. The classical inputs are the QPU that you want to characterize and the list of properties to measure. The quantum experiments are the characterization circuits that the utility generates from these inputs.
First, select the least-busy available QPU with a minimum of 120 qubits. The results in this tutorial were collected on ibm_boston, a Heron r3 processor, on 6 October 2026.
service = QiskitRuntimeService()
backend = service.least_busy(
    operational=True,
    simulator=False,
    min_num_qubits=120,
)
Next, choose which properties to measure. You can pass any subset of the following experiments:
readout: SPAM (state preparation and measurement) experimentrb_1q: isolated single-qubit randomized benchmarkingrb_2q: simultaneous two-qubit randomized benchmarking from a layer fidelity experimentt2: Hahn echo experiment (a single echo by default)t1: relaxation experiment
Run the full suite to characterize the device completely. To save QPU time, remove the entries for any properties that you do not need.
experiments = ["readout", "rb_1q", "rb_2q", "t1", "t2"]Step 2: Optimize problem for quantum hardware execution
In most tutorials, this step is where you transpile your circuits. In this tutorial, BackendCharacterization handles transpilation internally. It builds the experiment circuits directly in the native gates of the device, runs the single-qubit experiments on all qubits in parallel, and schedules the two-qubit benchmarking over disjoint layers of the coupling map, so that a small number of jobs cover the entire device. Because of this parallelization, the whole suite uses only about 70 seconds of QPU time.
Initialize the class that manages the workflow:
# Initialize the class used to run the experiments
characterizer = BackendCharacterization(backend)
Step 3: Execute using Qiskit primitives
The run_experiments method builds the circuits and submits them as Sampler jobs. Run it inside a Batch context so that the jobs are scheduled together on the QPU. The method returns after it submits all of the jobs. You can also run the method outside a Batch or inside a Session.
You might see a warning that a backend was passed while a session context manager is open. This warning is expected, and you can safely ignore it. The layer fidelity experiment might also warn that it does not use the optional xslow gate. You can ignore this warning too, because the experiment uses supported standard single-qubit gates.
# Run the characterization experiments inside a Batch
with Batch(backend=backend):
    jobs = characterizer.run_experiments(experiments=experiments)
Output:
base_primitive.get_mode_service_backend:WARNING:2026-10-06 12:30:28,757: A backend was passed in as the mode but a session context manager is open so this job will run inside this session/batch instead of in job mode.
Building readout experiments
Building 1Q RB experiments
Building 2Q RB experiments
Building T1 experiments
Building T2 experiments
layer_fidelity.py:258: UserWarning: Not using single qubit gate "xslow". Please open an issue if support for using gates outside of Qiskit's standard gates is needed for layer fidelity.
  warnings.warn(
Layered two-qubit RB submitted: ['db2i4sk2ljfc73d4h54g', 'db2i52nr11fs7396pqe0', 'db2i5hc7f06c73apso10', 'db2i5ks2ljfc73d4h5u0']
Readout job submitted: db2i5l42ljfc73d4h5ug
T1 experiment submitted: ['db2i5le8v0ts73c2sc6g']
T2 (Hahn) experiment submitted: ['db2i5ls2ljfc73d4h5vg']
Single-qubit RB submitted: ['db2i6fs7f06c73apsp9g', 'db2i6lnr11fs7396psa0']
The method returns the submitted jobs as a dictionary with one entry per experiment. Use this dictionary to track the jobs on the IBM Quantum Platform dashboard or to debug them.
# Print all the job IDs for debugging purposes
jobs
Output:
{'rb_2q': [<RuntimeJobV2('db2i4sk2ljfc73d4h54g', 'sampler')>,
  <RuntimeJobV2('db2i52nr11fs7396pqe0', 'sampler')>,
  <RuntimeJobV2('db2i5hc7f06c73apso10', 'sampler')>,
  <RuntimeJobV2('db2i5ks2ljfc73d4h5u0', 'sampler')>],
 'readout': [<RuntimeJobV2('db2i5l42ljfc73d4h5ug', 'sampler')>],
 't1': [<RuntimeJobV2('db2i5le8v0ts73c2sc6g', 'sampler')>],
 't2': [<RuntimeJobV2('db2i5ls2ljfc73d4h5vg', 'sampler')>],
 'rb_1q': [<RuntimeJobV2('db2i6fs7f06c73apsp9g', 'sampler')>,
  <RuntimeJobV2('db2i6lnr11fs7396psa0', 'sampler')>]}
Step 4: Post-process and return result in desired classical format
Analyze the results
The analyze_results method waits for the jobs to finish and then processes the measurement data. It fits exponential decays to the and data, fits survival-probability decays to the RB data, and computes assignment matrices for readout. It returns a dictionary of error maps, with one entry per measured property. Each error map assigns a measured value to each qubit (or qubit pair).
error_maps = characterizer.analyze_results()print(f"The following error maps are available: {list(error_maps.keys())}")
readout_q0 = error_maps["readout_error"][0]
print(f"For example, readout error for qubit 0 is {readout_q0}")Output:
The following error maps are available: ['readout_error', 'oneq_error_x', 'oneq_error_sx', 'lf_error_map', 't1_map', 't2_map']
For example, readout error for qubit 0 is 0.0023999999999999577
The maps cover readout error, the single-qubit x and sx gate errors, the layered two-qubit errors (lf_error_map, from the layer fidelity experiment), and the and times in seconds.
Update the backend properties
The update_backend method writes the measured values into the properties of a copy of the backend and returns the copy. The original backend object keeps the reported calibration data, so that you can compare the two sets of properties, as shown in the next section. This update applies only to your Python session. It does not change anything on the device or for other users.
backend_updated = characterizer.update_backend()Output:
Updating readout error
Updating single-qubit X error
Updating single-qubit SX error
Updating two-qubit error
Updating T1
Updating T2
Compare the measured properties against the reported ones
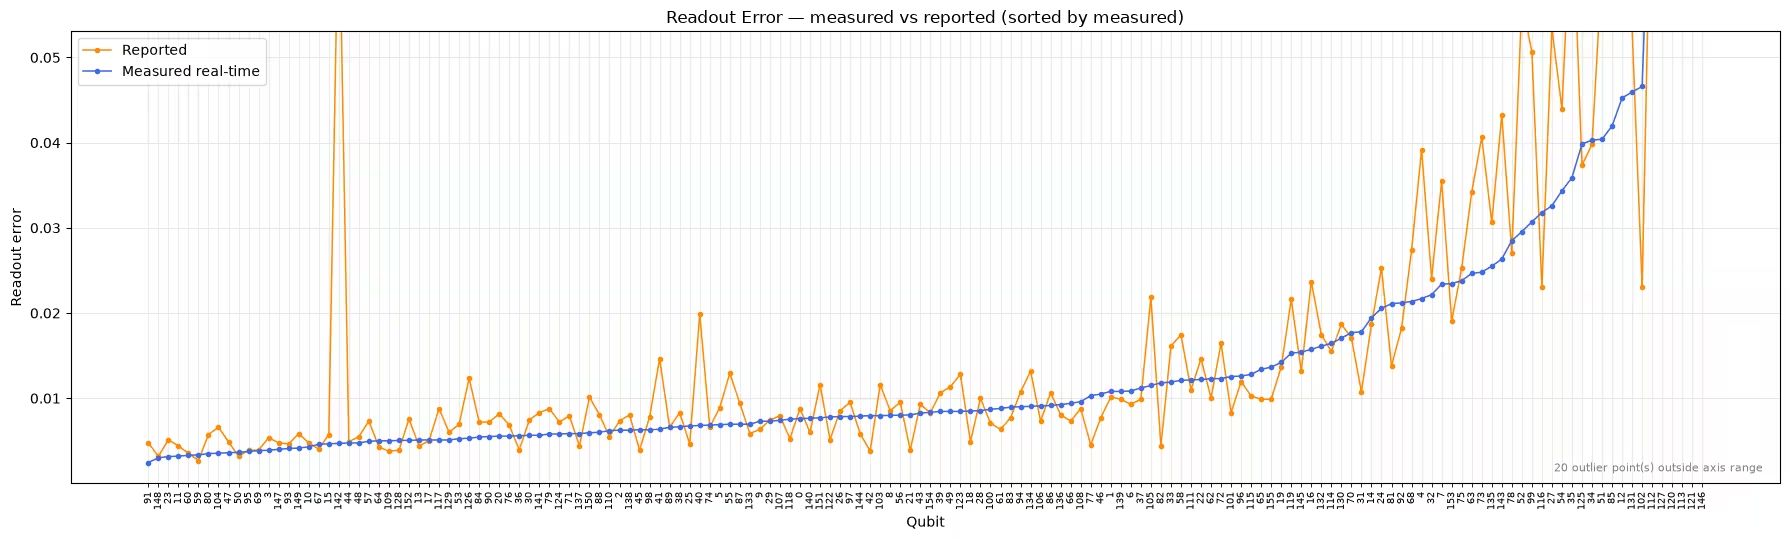
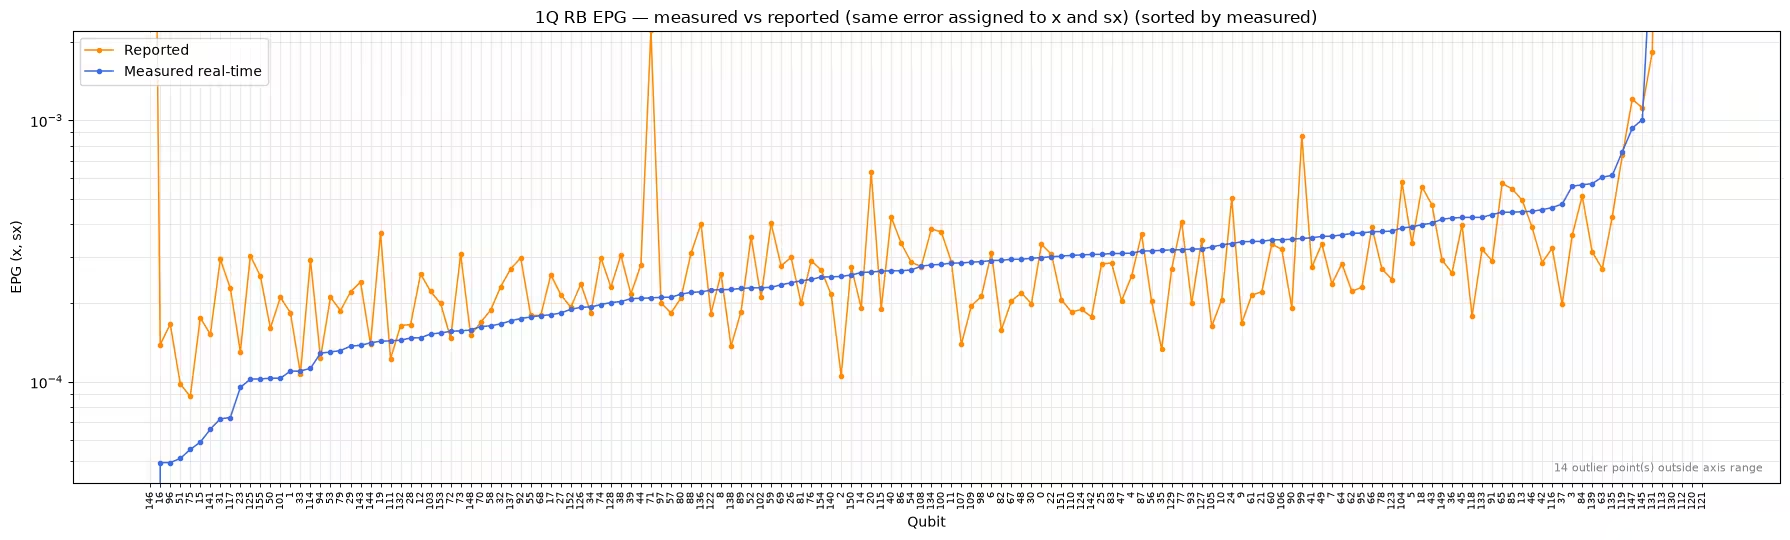
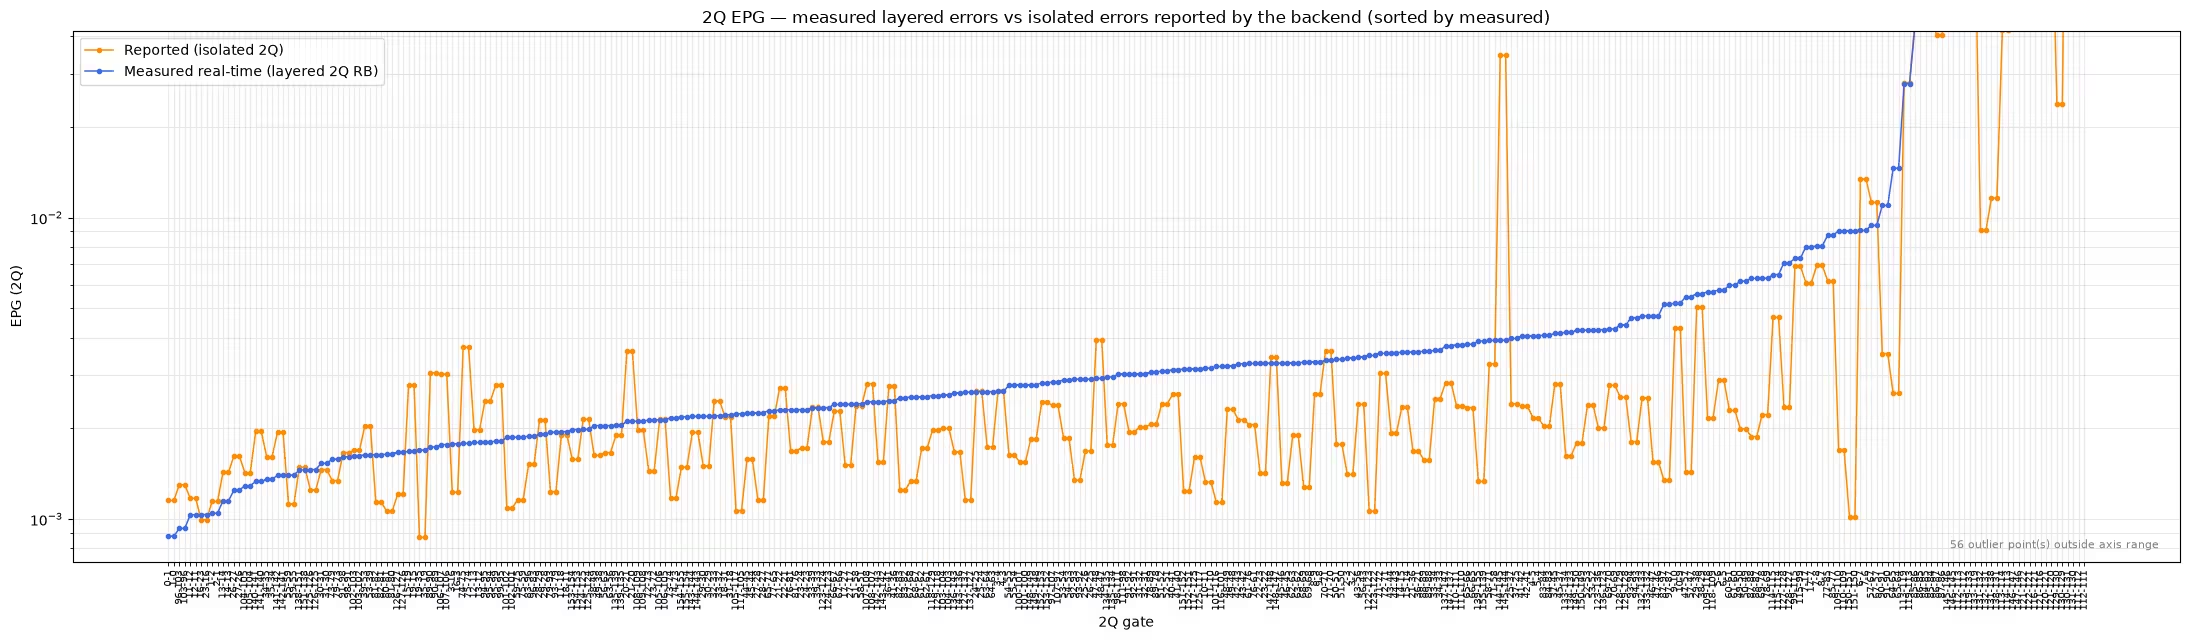
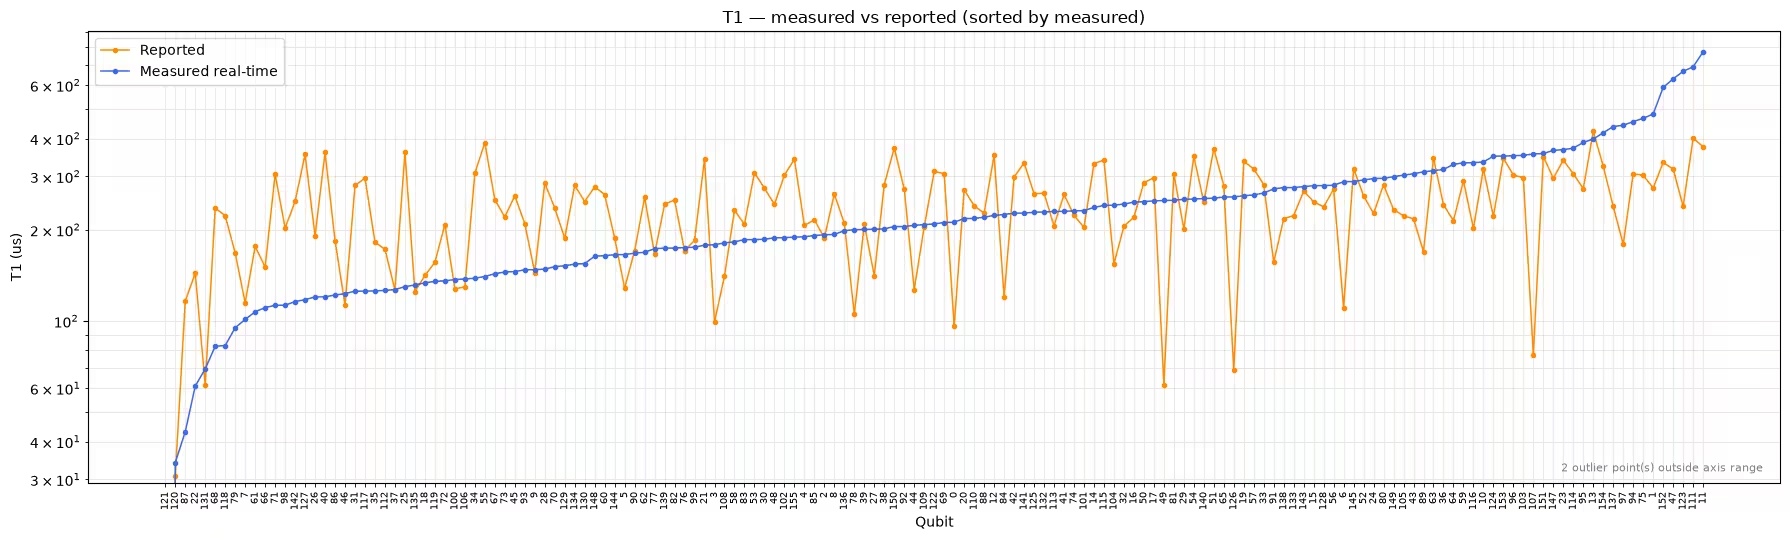
Finally, plot the measured real-time properties against the values that the backend reports. In each panel, the qubits (or qubit pairs) are sorted by measured value, so the measured curve is smooth by construction. The scatter of the reported values around this curve shows where the two data sets disagree. The single-qubit RB results appear in one plot, because the utility assigns the same measured error per gate to both the x and sx gates. The axis limits are based on most of the data, so that a few extreme outliers do not compress the plots. An annotation on each plot counts any points that fall outside the range. To set the limits yourself, pass the ylim argument.
plot_characterization_comparison(
    old_props=backend.properties().to_dict(),
    new_props=backend_updated.properties().to_dict(),
    plots=["readout", "rb_1q", "rb_2q", "t1", "t2"],
)
Output:
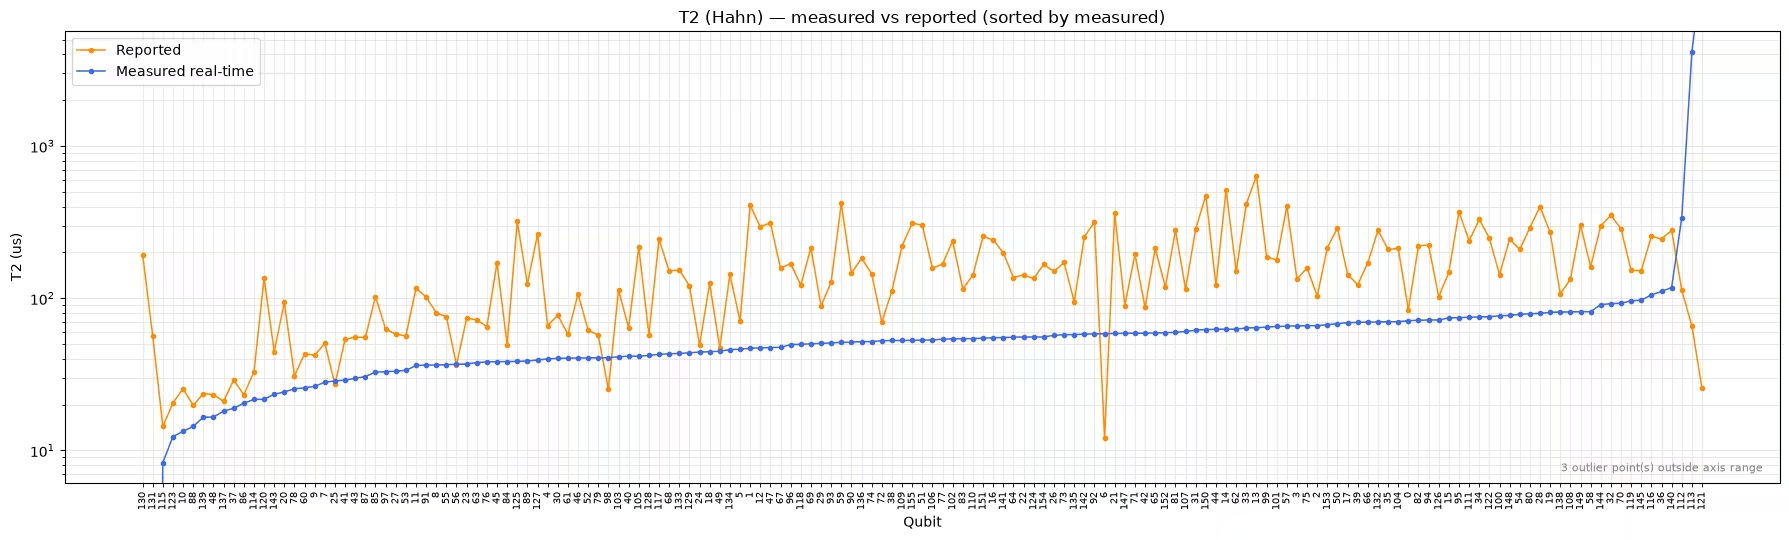
Read these plots carefully, because not every gap between the two curves means that the device has drifted:
- Readout and single-qubit errors: The measured values track the reported ones for most qubits, but for a few qubits the reported value is far from the measured curve. These localized disagreements can reflect the drift that this workflow is designed to detect.
- : The two data sets scatter around each other with no systematic offset, which is consistent with natural fluctuation of over time.
- Two-qubit errors: The measured values are systematically above the reported ones. This difference is expected, because the reported values come from isolated gates, while the layer fidelity experiment runs many gates simultaneously and therefore includes crosstalk. The layered values are more relevant for deep circuits, but they are not directly comparable to the reported calibration data.
- : The measured values are well below the reported ones for most qubits. As with the two-qubit errors, methodology plays a large role, which the next section examines.
Inspect individual experiment results
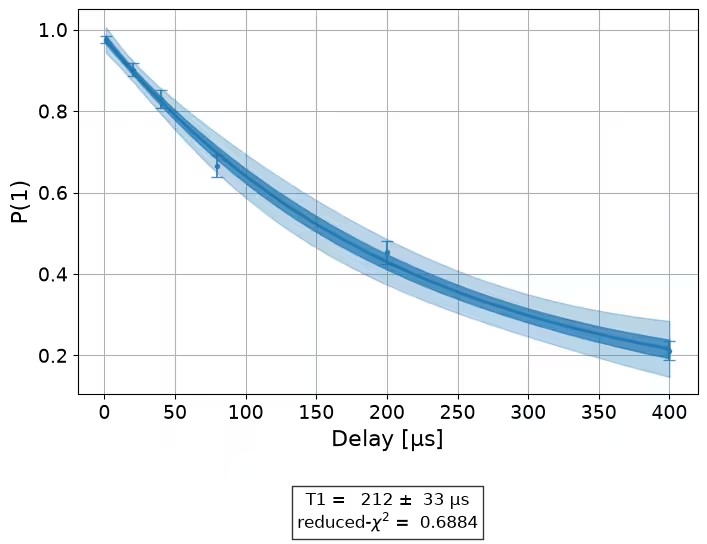
You can also inspect the raw results of the individual characterization experiments through the experiment_data property, which returns the underlying Qiskit Experiments ExperimentData objects. For example, the following code displays the measured decay curve of a single qubit. Use a curve like this one to check the quality of a fit before you rely on the value that the fit produced.
t1_data = characterizer.experiment_data["t1"]

# Each qubit has its own fit figure
n_figs = len(t1_data.figure_names)
print(f"{n_figs} figures available, e.g. {t1_data.figure_names[0]}")

# Show the T1 decay curve of the first qubit
t1_data.figure(0)
Output:
156 figures available, e.g. T1_Q0_ee504947.svg
Measure T2 with a dynamical decoupling train
By default, the experiment applies a single Hahn echo and measures all qubits in parallel. As the previous comparison plot shows, this method can produce noticeably lower values than the backend reports. One possible cause is the number of echoes. The reported values might come from a calibration that uses dynamical decoupling, which suppresses low-frequency noise. To test this hypothesis, run a -only characterization with a larger value of t2_num_echoes, which applies a CPMG-style train of echo pulses. In both cases, the delays represent the total free-evolution time, so the fitted values are directly comparable to the single-echo results.
# Run a T2-only characterization using a CPMG-style train of 8 echoes
characterizer_dd = BackendCharacterization(backend)
backend_updated_dd = characterizer_dd.run_and_update(
    experiments=["t2"], t2_num_echoes=8
)
Output:
Building T2 experiments
T2 (Hahn) experiment submitted: ['db2i7uc2ljfc73d4h8mg']
Updating T2
# Compare the multi-echo T2 against the backend-reported values
plot_characterization_comparison(
    old_props=backend.properties().to_dict(),
    new_props=backend_updated_dd.properties().to_dict(),
    plots=["t2"],
    title_prefix="8-echo CPMG",
)

# Compare medians across the reported values, the single-echo run,
# and the 8-echo run
reported_t2s = [
    prop["value"]
    for qubit in backend.properties().to_dict()["qubits"]
    for prop in qubit
    if prop["name"] == "T2"
]
t2_reported = np.median(reported_t2s)
t2_single = np.median(list(error_maps["t2_map"].values())) * 1e6
t2_dd = (
    np.median(list(characterizer_dd.analyze_results()["t2_map"].values()))
    * 1e6
)
print(
    f"Median T2 — reported: {t2_reported:.0f} us | "
    f"single echo: {t2_single:.0f} us | 8-echo CPMG: {t2_dd:.0f} us"
)
Output:
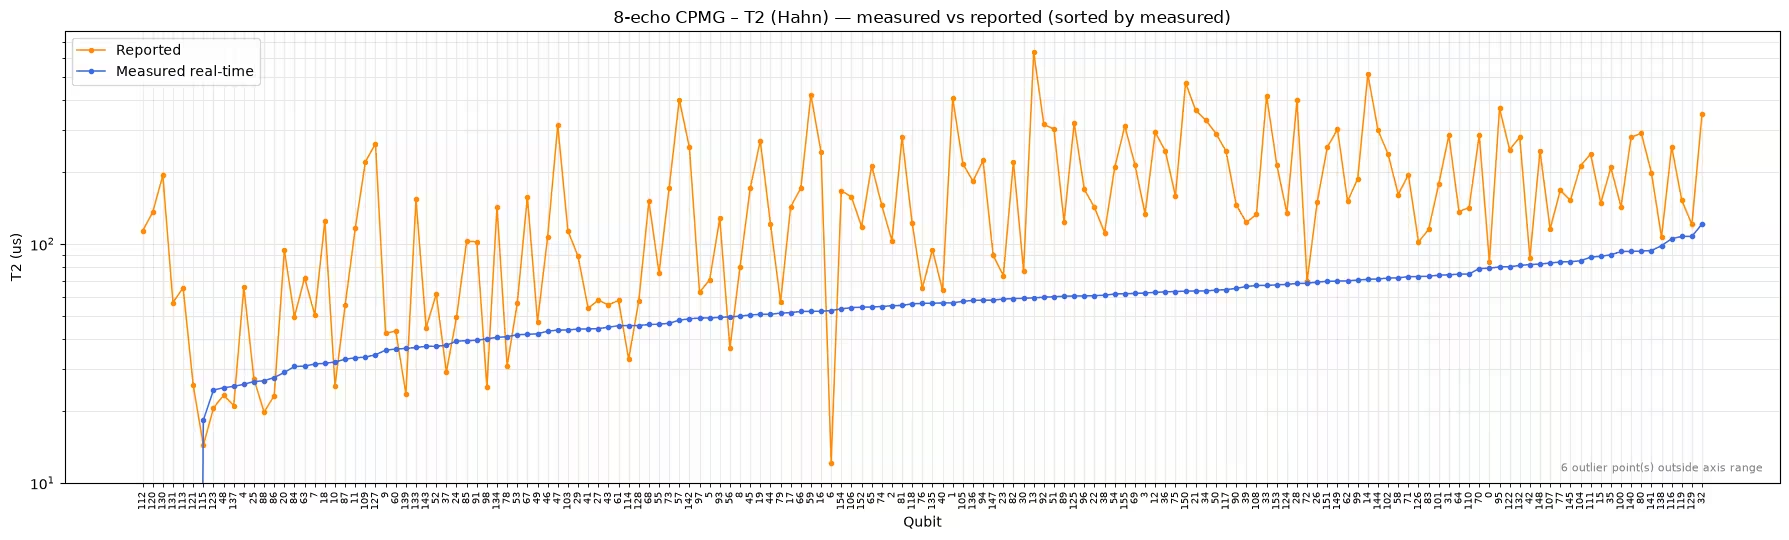
Median T2 — reported: 300 us | single echo: 75 us | 8-echo CPMG: 77 us
In this run, the extra echoes barely changed the result. The 8-echo median (77 µs) is close to the single-echo median (75 µs), and both remain far below the reported median (300 µs). The number of echoes alone does not explain this gap. Other methodological differences also contribute, such as details of the calibration procedure, and measurement of all qubits in parallel instead of in isolation.
Therefore, compare values (and layered two-qubit errors) across methodologies with care. The refreshed values are a self-consistent snapshot, taken under conditions close to those of a real workload. These values are well suited to compare qubits with each other or to track a device over time. A gap relative to the reported calibration data, however, is not automatically evidence of drift.
Run steps 1–4 in a single call
For routine use, you rarely need the intermediate results. The run_and_update method combines the previous steps (build, submit, fit, and update) into a single call that returns the refreshed backend. It accepts the same experiments list and forwards options such as t2_num_echoes. You can also wrap it in a Batch or Session context.
The following cell does not return until all jobs and post-processing are complete.
# Initialize a fresh characterizer
characterizer = BackendCharacterization(backend)

# Run all of the experiments and update the backend in a single call
backend_updated = characterizer.run_and_update(experiments=experiments)
Output:
Building readout experiments
Building 1Q RB experiments
Building 2Q RB experiments
Building T1 experiments
Building T2 experiments
layer_fidelity.py:258: UserWarning: Not using single qubit gate "xslow". Please open an issue if support for using gates outside of Qiskit's standard gates is needed for layer fidelity.
  warnings.warn(
Layered two-qubit RB submitted: ['db2i8fe8v0ts73c2sfsg', 'db2i8j42ljfc73d4h9qg', 'db2i91k7f06c73apsstg', 'db2i95e8v0ts73c2sgsg']
Readout job submitted: db2i95m8v0ts73c2sgtg
T1 experiment submitted: ['db2i9647f06c73apst40']
T2 (Hahn) experiment submitted: ['db2i96nr11fs7396pvpg']
Single-qubit RB submitted: ['db2ia3e8v0ts73c2si90', 'db2ia8c2ljfc73d4hc00']
Updating readout error
Updating single-qubit X error
Updating single-qubit SX error
Updating two-qubit error
Updating T1
Updating T2
The refreshed backend_updated object is ready for the GHZ comparison in the next section. Refresh the properties close to execution time to reduce the effect of further device drift.
Use refreshed properties for qubit selection
This optional example completes the workflow. It checks whether the refreshed properties lead to better circuit results. It compiles the same circuits twice, once with the reported properties and once with the refreshed properties. Then it runs both versions and compares their outputs. This example uses the backend and backend_updated objects from the previous sections, and it submits additional work to the QPU.
Build the comparison circuits
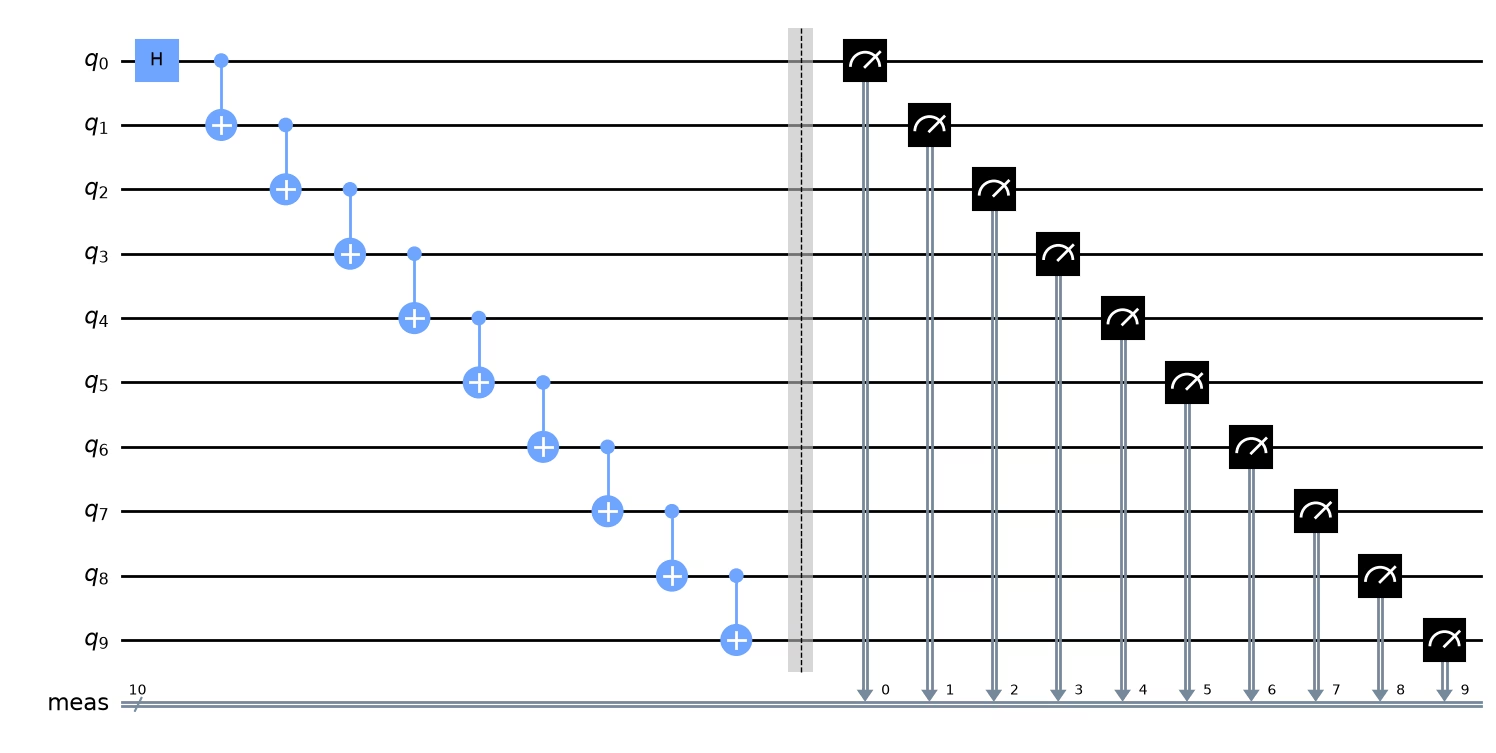
Prepare an -qubit Greenberger-Horne-Zeilinger (GHZ) state with a Hadamard gate followed by a chain of CNOT gates, and measure every qubit. Ideally, the outcomes and each have probability 0.5. Because you measure every qubit, an error on any qubit in the chain, including a readout error, reduces the probability of the ideal outcomes. The measured outputs are therefore sensitive to the physical qubits that the transpiler selects.
Refreshed properties tend to matter most at moderate sizes, where the transpiler can choose from many candidate qubit chains. Very large circuits use most of the device, so the transpiler has little room to avoid poorly performing qubits. To save QPU time, reduce the list of circuit sizes.
num_qubits_list = list(range(5, 41, 5))
circuits = []
for num_qubits in num_qubits_list:
    circuit = QuantumCircuit(num_qubits)
    circuit.h(0)
    for qubit in range(num_qubits - 1):
        circuit.cx(qubit, qubit + 1)
    circuit.measure_all()
    circuits.append(circuit)

circuits[1].draw(output="mpl", style="clifford", fold=-1)
Output:
Transpile with reported and refreshed properties
The transpiler uses a Target to choose physical qubits and native instructions. If you update only the backend properties, an existing target can remain unchanged. Instead, copy the original target and explicitly apply the refreshed errors and coherence times to the copy. The copy keeps the original instruction durations and connectivity. If a coherence time is unavailable for a qubit, keep its existing target value.
A reported error of 1 means that the error is undefined, because benchmarking of that qubit or gate has not succeeded for several days, and the value is outdated (see QPU information). This value does not necessarily mean that the gate is not working, but you should treat the gate with caution. A single characterization run can still fit a low error for such a gate, so that the gate appears to be one of the best on the device. To be cautious, keep those entries at their reported value so that the transpiler continues to avoid them.
Use the same optimization level and random seed for both compilations so that the comparison controls for transpiler randomness.
target_updated = deepcopy(backend.target)
properties_updated = backend_updated.properties()

for gate in properties_updated.gates:
    if not any(
        parameter.name == "gate_error" for parameter in gate.parameters
    ):
        continue
    qargs = tuple(gate.qubits)
    if gate.gate not in target_updated.operation_names:
        continue
    if qargs not in target_updated[gate.gate]:
        continue
    instruction_properties = deepcopy(target_updated[gate.gate][qargs])
    # Keep gates whose reported error is undefined (error of 1)
    if (
        instruction_properties is not None
        and instruction_properties.error < 1
    ):
        instruction_properties.error = properties_updated.gate_error(
            gate.gate, qargs
        )
        target_updated.update_instruction_properties(
            gate.gate, qargs, instruction_properties
        )

for qubit in range(backend.num_qubits):
    measurement_properties = deepcopy(target_updated["measure"][(qubit,)])
    if measurement_properties.error < 1:
        measurement_properties.error = properties_updated.readout_error(qubit)
        target_updated.update_instruction_properties(
            "measure", (qubit,), measurement_properties
        )
    qubit_properties = properties_updated.qubit_property(qubit)
    if "T1" in qubit_properties:
        target_updated.qubit_properties[qubit].t1 = qubit_properties["T1"][0]
    if "T2" in qubit_properties:
        target_updated.qubit_properties[qubit].t2 = qubit_properties["T2"][0]

pm_reported = generate_preset_pass_manager(
    target=backend.target, optimization_level=3, seed_transpiler=42
)
pm_refreshed = generate_preset_pass_manager(
    target=target_updated, optimization_level=3, seed_transpiler=42
)
isa_reported = pm_reported.run(circuits)
isa_refreshed = pm_refreshed.run(circuits)
Before you run the circuits, check how many physical qubits each refreshed layout changes. If the two compilations select the same qubits, the refreshed properties cannot make a difference for that circuit.
for num_qubits, circuit_reported, circuit_refreshed in zip(
    num_qubits_list, isa_reported, isa_refreshed
):
    qubits_reported = set(circuit_reported.layout.final_index_layout())
    qubits_refreshed = set(circuit_refreshed.layout.final_index_layout())
    num_changed = len(qubits_refreshed - qubits_reported)
    print(f"GHZ-{num_qubits}: {num_changed} of {num_qubits} qubits changed")
Output:
GHZ-5: 5 of 5 qubits changed
GHZ-10: 10 of 10 qubits changed
GHZ-15: 15 of 15 qubits changed
GHZ-20: 20 of 20 qubits changed
GHZ-25: 15 of 25 qubits changed
GHZ-30: 11 of 30 qubits changed
GHZ-35: 18 of 35 qubits changed
GHZ-40: 18 of 40 qubits changed
Execute both sets of circuits
Run both versions on the same QPU, with the same shot count and error suppression settings. Interleave the reported and refreshed versions in the submission, and repeat the comparison three times to observe the variation between trials. The order of submission does not guarantee the order of execution, and interleaving does not eliminate drift.
n_trials = 3
shots = 4096
interleaved_circuits = [
    circuit for pair in zip(isa_reported, isa_refreshed) for circuit in pair
]
sampler = SamplerV2(mode=backend)
sampler.options.environment.job_tags = ["TUT_RTBQS"]
sampler.options.dynamical_decoupling.enable = True
sampler.options.dynamical_decoupling.sequence_type = "XY4"
comparison_job = sampler.run(interleaved_circuits * n_trials, shots=shots)
print(f"Comparison job ID: {comparison_job.job_id()}")
Output:
Comparison job ID: db2ici47f06c73apt1j0
Compare the output distributions
Compute the Hellinger fidelity between each measured distribution and the ideal GHZ distribution. A value of 1 means that the distributions match. This metric measures agreement only in the computational basis. It does not measure the coherence between and , so it is an upper bound on the GHZ state fidelity, not a certificate of entanglement.
The plot shows the mean across trials. The error bars indicate one standard deviation.
comparison_results = comparison_job.result()
fidelities = np.empty((n_trials, len(num_qubits_list), 2))
for trial in range(n_trials):
    for chain_index in range(len(num_qubits_list)):
        for variant in range(2):
            result_index = (
                trial * 2 * len(num_qubits_list) + 2 * chain_index + variant
            )
            counts = comparison_results[result_index].data.meas.get_counts()
            num_qubits = num_qubits_list[chain_index]
            ideal_dist = {"0" * num_qubits: 0.5, "1" * num_qubits: 0.5}
            fidelities[trial, chain_index, variant] = hellinger_fidelity(
                ideal_dist, counts
            )

fig, ax = plt.subplots(figsize=(8, 5))
for variant, label in enumerate(
    ["Reported properties", "Refreshed properties"]
):
    ax.errorbar(
        num_qubits_list,
        fidelities[:, :, variant].mean(axis=0),
        yerr=fidelities[:, :, variant].std(axis=0),
        fmt="o-",
        label=label,
    )
ax.set_xlabel("Number of qubits in GHZ state")
ax.set_ylabel("Hellinger fidelity")
ax.set_xticks(num_qubits_list, labels=num_qubits_list, rotation=45)
ax.legend()
ax.grid(True)
fig.tight_layout()
plt.show()

for num_qubits, (reported, refreshed) in zip(
    num_qubits_list, fidelities.mean(axis=0)
):
    print(
        f"GHZ-{num_qubits}: reported {reported:.3f} | refreshed {refreshed:.3f}"
    )
Output:
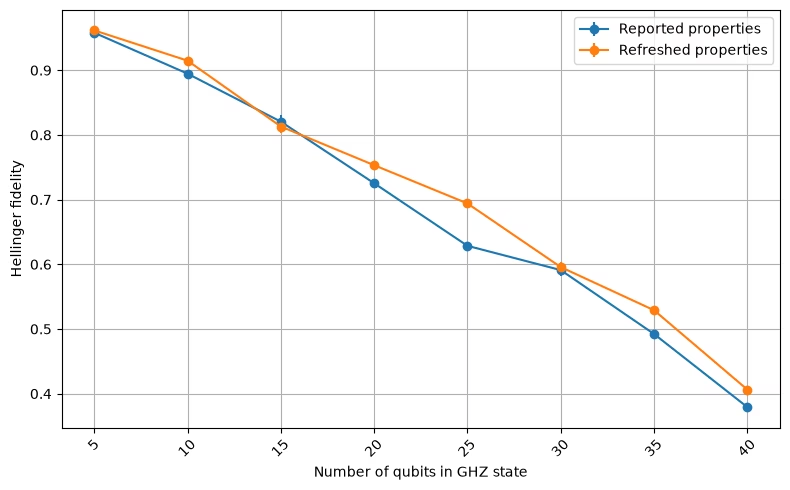
GHZ-5: reported 0.958 | refreshed 0.962
GHZ-10: reported 0.895 | refreshed 0.915
GHZ-15: reported 0.821 | refreshed 0.813
GHZ-20: reported 0.725 | refreshed 0.753
GHZ-25: reported 0.629 | refreshed 0.694
GHZ-30: reported 0.591 | refreshed 0.596
GHZ-35: reported 0.492 | refreshed 0.529
GHZ-40: reported 0.379 | refreshed 0.406
In this run, the refreshed properties changed some or all of the selected qubits at every size, and the refreshed layouts gave a higher mean fidelity for seven of the eight GHZ states. The largest gain was for the 25-qubit state, where the mean fidelity increased from 0.629 to 0.694. The refreshed layout scored higher in every trial for the 5-, 10-, 20-, 25-, 35-, and 40-qubit states. Not every size improved. For the 15-qubit state, the refreshed layout was slightly worse (0.813 compared with 0.821). For the 30-qubit state, the difference (0.596 compared with 0.591) is within the variation between trials.
Refreshed properties do not guarantee better results. The benefit depends on how far the device has drifted since its last calibration. Also, the characterization is itself a noisy snapshot. The transpiler can select a qubit or gate that happens to measure well, even if that qubit or gate does not perform better. Shot noise, further drift between characterization and execution, and differences in characterization methodology also affect the comparison. Use the measured change and its variation to decide whether refreshed properties are useful for your workload.
Next steps
- Apply the qubit-selection comparison to your own circuits and evaluate whether the benefit justifies the cost of characterization
- Learn how to access the reported calibration data in the QPU information guide
- Explore the individual characterization experiments in the Qiskit Experiments documentation
- Browse additional device-level benchmarks in the Qiskit Device Benchmarking repository